Z Brush Guides, Methods, and Tricks
Export MaterialCap to Disk for Texture


The universal objective when rendering sculpt assets is to preserve the detail and color from the sculpting program. The ZBrush Export write-up covers workflows to preserve detail. Preserving color is another task, and is ultimately more complicated.

This is due to the fact that ZBrush and other sculpting programs use realtime graphic and shading operations. The sculpt is 'illuminated' with a realtime GI shading system.

The matcap library in ZBrush is not convertable to traditional 3D package shader libraries for this reason. They are very different modules, matcaps are not material shaders in the traditional modeling package sense...

Figure 01: Image Plane PolyMesh with Material Texture


...This write-up covers a ZBrush method that converts matcaps to UV space, projects them to a plane, and from there can be stored to disk as a texture (Figure 01).

This work-around may be ideal for some projects, but due to the 'tricking' of ZBrush to achieve these ends, there are limitations that occur.

In ZBrush, open your finalized tool, it should consist of UVs. A 'colorize' 3D paint texture is optional but recommended, as it will layer nicely with the matcap.

If no 3D texture is desired, a 'new' white texture should be generated instead (Figure 02). With UVs, this white texture is used as the 'canvas..'


Figure 02: Cloning 3D 'Colorize' Texture to Texture Tab


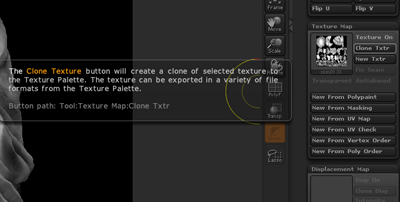
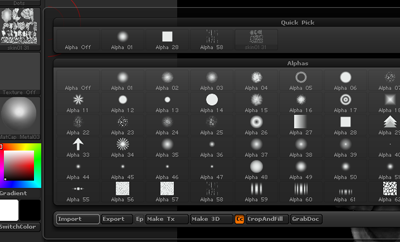
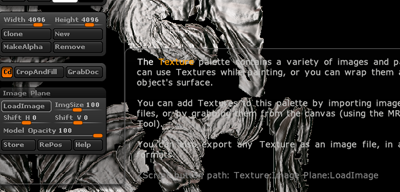
..I compare to a canvas because, ultimately, what is desired from the 3D texture is the dimension ie 2048x2048. Clone the texture, which will add the it to the texture palette on the left.

Before moving on, the Image Plane plugin is required. It can be download from the ZBrush home site. Also, in the document tab, make sure the background color is changed from the default gradient to complete black.

Create a displacement for your mesh, depending on your version of ZBrush, you can move it directly to the 'alpha' tab in the left tool palette by way of 'Clone' button. If not, save it to disk and then click 'Alpha > Import' from the alpha tab. We want the displacement selected as an alpha here (Figure 03).


Figure 03: Loading Mesh Displacement as Alpha


At this point there should be the displacement selected in the alpha, and the texture in the texture tab. Next, open the texture tab and click 'crop and fill.'

This will change ZBrush's document size to the dimensions of the texture. Now, clear the canvas.

If the Plane Image plugin is active, there will be a Plane Image tab in the texture palette window (Figure 04). Use 'Load Image.'

This will drop the selected texture onto the ZBrush canvas, on top of a polyplane.

Figure 04: Using Image Plane to Drop a PolyMesh Plane


Switch to edit mode, but careful not to scale the mesh, as that will disrupt resolution. Instead use the zoom option to fit the canvas to screen.

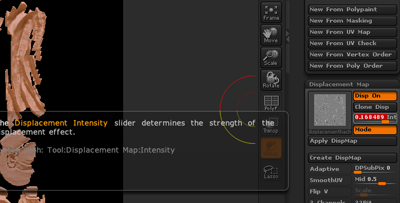
Make sure material is set to flat color. Then click Make PolyMesh3D to make the mesh an adjustable poly.

With the new PolyMesh3D, switch from flat color to any desired material. There should be a visible change to the texture. However, lighting and additional values are still not visible.

To bring up the final detail, scroll down to the displacement, and increase intensity. Now lighting value will appear on the plane (Figure 05).

Figure 05: Increasing Intensity Increases Material Cap Values


The material menu can be used to adjust light tolerance and color information for materials. Adjusting intensity of displacement will adjust 'opacity' of the material.

Once the desired adjustments are made, click 'Texture > GrabDoc/Export' to save your new texture to disk. This texture can be used in the 3D environment to give color resemblence to the ZBrush sculpt (Figure 07).

One final concept is to 'GrabDoc' multiple matcaps of different lighting varieties, and composite them into a single texture using photo manipulation software. For example, the 'White Matte' matcap provides genuine illumination, but lacks reflectance and highlights. Grab a Foil or Metallic matcap as well (these are very strong in reflectance and highlight), and using Photoshop, screen or overlay those materials atop.

Experimenting and combining a variety of baked matcaps provides numerous and appealing texture effects.

Figure 06: ZBrush Environment RedWax MatCap Snapshot


Note:
Limitations were mentioned earlier. From testing, I've concluded that this texture generation process is incredibly UV wrap sensitive. UV maps are especially sensitive regarding tiling and edges.

This is because matcaps provide illumination as well as coloration. Consider as well, the illumination is baked into the texture. This will make surfacing and lighting method complications, as you'll have to make the lighting match the baked lighting in the texture.

The ZBrush Material palette allows manipulation of light tolerance as well as the ability to completely remove lighting aesthetics. However, as a trade-off detail and variation in the matcap will dilute.

As written above, this method is a purely circumstancial approach, and is not ideal for all 3D scenes.

Figure 07: RfM Render with Baked RedWax Matcap Texture